
Bey Rivals best build candidates
Read each row as a complete combination, not a recommendation to swap in one expensive part blindly. The Workshop frame at 0:12 directly confirms Dire Drake, Nine and Xtreme in KingEgo's video. The other rows remain secondary reports; a visible combination does not establish a win rate or a universal best build.
| Layer | Disc / Driver | Creator / evidence | What to test |
|---|---|---|---|
| Halo Helios | Jerk / Xtreme | KingEgo · Community-reported | Does Jerk's reported defensive direction support your approach? |
| Surge Spriggan | Jerk / Xtreme | KingEgo · Community-reported | How do Spriggan's actions change your timing with the same part pair? |
| Dire Drake | Nine / Xtreme | KingEgo · Creator-demonstrated at 0:12 | Can you create attack pressure without wasting approaches? |
| Kaiser Cerberon | Infinity / Weight | Moobert · Community-reported | Does this setup help you practice a spin-preservation plan? |
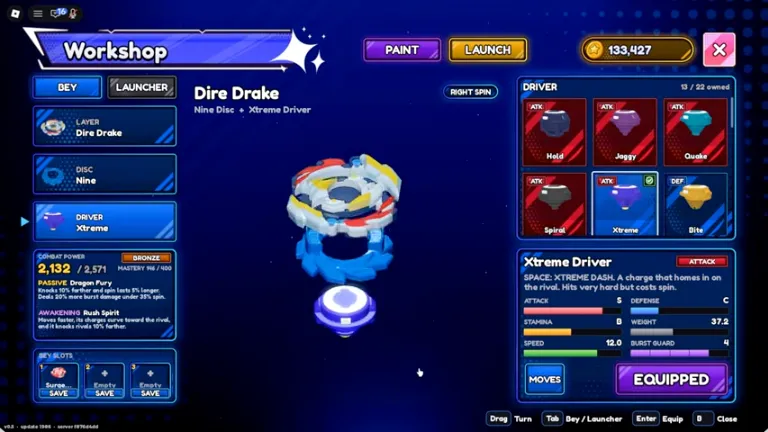
Evidence: Community build coverage · KingEgo — Workshop at 0:12 · Moobert — Cerberon build video
What makes a Bey Rivals best build useful?
A useful build has an identifiable job. Your Layer establishes the Bey you are learning; the Disc and Driver should help with the situation you face. Community examples are valuable because they name all three parts. A screenshot of an impressive finish without the setup is much harder to apply.
The Bey Rivals best build for your account must also be attainable. If you lack a named component, compare the actual values and behavior of what you own. Matching a label while ignoring upgrade differences produces a poor comparison. No exact stat total is supplied here because the examples have not been independently measured at a consistent level.
Evidence: Community build coverage
Choose a purpose for your parts
These are comparison questions, not hidden formulas or fixed rules about matching part types. A Bey Rivals best build can mix components with different labels when there is a clear reason. Explain the intended benefit before deciding whether a substitution helped.
| Goal | Look for during practice | Tradeoff to investigate |
|---|---|---|
| Create pressure | Whether you can approach and land your intended action | Extra chasing may leave you poorly positioned |
| Survive an approach | Whether your response is available when an attack arrives | Surviving alone may not create a winning opportunity |
| Preserve spin | How much movement you need to remain effective | Passive play can surrender control of the arena |
| Adapt to different opponents | Whether the same setup supports more than one response | Flexibility still requires learning individual actions |
Compare parts in the Workshop
Menu names are described in community walkthroughs. Follow the current game's prompts if its layout differs. The Bey Rivals best build process is a comparison, not a requirement to purchase a particular rarity.
- Open Inventory and identify the Layer you want to practice. Record its name and the moves currently unlocked.
- Open Workshop and inspect the equipped Disc and Driver. Read their displayed information before changing either slot.
- Select one replacement and compare the values shown by the game. Keep the other parts unchanged so the comparison has a useful baseline.
- Return to practice and observe the action that motivated the change. If the replacement does not help that action, revisit the choice before upgrading it.
Evidence: Community beginner reference
Upgrade after you understand the setup
Before merging or consuming anything, inspect the confirmation and the items selected. Keep an alternative part if you still want to compare it. This guide does not assume that an upgrade can be reversed or that a familiar material has the same cost in every version.
A practical order is to identify a setup, learn its controls, test a single change, then decide whether the improvement is worth the displayed cost. Chasing every new recommendation makes it difficult to learn which change mattered. Your Bey Rivals best build should have a reason for each part, even when that reason is simply that it performs reliably with your existing resources.
Test a Bey Rivals best build fairly
Repeat the comparison across several rounds instead of converting one win into a conclusion. Record losses too: they can expose a timing or positioning problem that a new part does not solve. Treat the result as personal practice evidence, not a public win-rate statistic.
A Bey Rivals best build recommendation should be reconsidered when the game changes or your available moves expand. The tier list provides balance context; this worksheet helps you decide whether that context changes your own setup.
| Record | Example of a useful observation |
|---|---|
| Baseline | Same Layer, Disc, Driver, levels and available moves |
| One change | Only the Driver changed; other conditions recorded |
| Opponent / setting | Similar matchup and arena where possible |
| Intended benefit | I want fewer wasted approaches |
| Observed result | Which actions connected, failed or left me exposed |
| Next decision | Keep testing, revert, or investigate another variable |
Questions answered
What is the Bey Rivals best build for beginners?
Begin with a complete setup you own and understand. Use the reported combinations as references, then learn one Layer and compare one part at a time. There is no independently tested universal beginner winner here.
Does a Mythic Driver guarantee the Bey Rivals best build?
No. A rarity label does not establish the performance of a whole setup. Compare the displayed values, available actions and intended purpose at the relevant upgrade level.
Can a Bey Rivals best build mix part types?
The reported Jerk and Xtreme combinations illustrate that community recommendations do not simply repeat one type label across every slot. Inspect each part and test the reason for combining them.
Should I upgrade before replacing a part?
Read the cost and preserve anything needed for comparison first. This Bey Rivals best build guide recommends establishing a baseline before spending resources, rather than assuming every upgrade is reversible.
Sources & evidence
Game facts, community reports and editorial recommendations are identified separately. A source link is evidence of what was reported, not proof of a result on your account.
Reports creator Workshop combinations; we have not independently reproduced these builds or measured their performance.
Secondary source for menu names and reported controls. On-screen prompts take precedence over this guide.
Frame directly inspected in the public video: Dire Drake, Nine Disc, Xtreme Driver and right-spin label. Displayed stats apply to this particular setup.
Creator video attributed by the secondary reference. Linked for readers to inspect; not an independently verified performance test.